Showing posts with label Butter. Show all posts

Wednesday, July 23, 2014

Cream Scones: a.k.a. A Fancy Biscuit With Stuff in It!

Cranberry Scones with Orange Butter Glaze
As a southern raised gal, I could not begin to count the number of biscuits I have been served or eaten. Biscuits were the most common form of bread made in my household, with cornbread running a close second. Every woman in my family had their own twist on the perfect biscuit; some liked them thick and bready, while others liked the top and bottom to be crisp and browned with bacon drippings. And this particular homemade bread wasn’t just for breakfast. It could show up in as a snack with whatever meat was leftover that morning; ham was my favorite. There were always a couple of those little treats waiting in a small plate on the stove when we came home from church on Sunday. Oh the memories of that dash from the car to kitchen.

Honestly, I had never heard of a Scone until I went to college. I attended some brunch event and saw something resembling a biscuit, but cut and baked in a pie slice shape with bits of stuff cooked inside it. Seemed odd, but I tried it. It was okay. Actually, it was horrible. Very dry. But all those attending kept asking if I had tried the Scones...weren’t the Scones just lovely....so I did what any proper southern girl was raised to do...I lied. I said they were deeee-licious! Over the next three decades I had opportunity to try and acquire a taste for Scones, but with little luck. I always felt like I was participating in that kids game where you put saltines in your mouth, chew them a little and the first who whistles, wins. The Scones I had tried were all dry and tasteless.

Then, (insert trumpets: da, dada, DA!) I receive a basket of Scones baked by the CFO of a hospital where my husband worked. Seems the CFO liked to bake when he was stressed. Dude made enough Scones one evening to feed a small army. In any case, I was thrilled. He made three varieties, Cranberry, Cinnamon Chip and Chocolate Chip. They were fluffy, light, buttery, crisp on top and bottom and moist inside. He had managed to take my Granny’s best biscuit recipe and fill it with tasty bits of dried fruit and other sweet temptations! I had no idea that Scones could be that good!

I immediately asked for the recipe and was shocked by the key ingredient, heavy cream. That is the only fat in this fancy biscuit. It is to be noted, that I have altered that portion of the recipe, just because I didn’t read the recipe right the first time and so I added the 2TBS of melted butter to the dough, before I read far enough to realize I was to use that to brush the tops of the Scones. It just made them taste so good that I left my mistake in the directions. What’s two more TBS of butter gonna hurt? Right?

It’s a very easy recipe to whip up when you have company and they are always impressed when you use the word Scone for some reason. You will definitely keep this recipe handy once you see how good it is. I now use it as my actual biscuit recipe, instead of the old one that required I cut in chunks of shortening.

You can top them with the fancy coarse decorators sugar (usually found by the bridal and cupcake stuff) or make a simple powdered sugar glaze. Actually, they don’t need anything but a little butter inside when you nab one right off the pan that’s hot out of the oven.

Cream Scones
Oven Temp: 400 degree
Cooking Time: 18-22 minutes

Ingredients:

  • 2 Cups all-purpose flour
  • 1/4 cup sugar
  • 1 TBS baking powder
  • dash of salt
  • 1 cup flavored bits* (optional), died cranberries, cinnamon chips, chocolate chips or other dried fruits/nuts, basically whatever you feel like creating...can be savory with cooked sausage/herbs..
  • 1 1/3 cups HEAVY cream (no substitutions)
  • 2 TBS melted butter
  • *I put the zest of half an orange in my Cranberry Scone version. I usually put lemon zest if I make Blueberry Scones.

For the tops:

  • 2 TBS melted butter
  • Coarse or decorative sugar
  • or glaze to be added after baking


Instructions:

  1. Put all dry ingredients in a large mixing bowl and combine.
  2. Add the flavored bits of your choosing...if you choose to have bits, if not, plain Scones are amazing, too! Mix well.
  3. Next add the cream and melted butter.
  4. Combine slowly with a spoon, or with your hands. Over working the dough makes a tough Scone/Biscuit.
  5. Turn out on a floured surface and kneed/fold about 4-5 times.
  6. Form the dough into a round flat shape and pat down to about a 1/2” thickness
  7. Cut into eight (8) pieces and place on an oiled cookie sheet, spreading each apart. The dough will rise while baking.
  8. Brush the tops and sides with the melted butter
  9. Sprinkle the tops with the coarse decorative sugar...unless you opted for the glaze or plain option, then do nothing.
  10. Bake at 400 degrees for 18-22 minutes. Tops should be golden and the middle should be done, but moist. Don’t leave to long or they will dry out.

Cranberry Scone Glaze:

  • 1 cup powdered sugar
  • 1 TBS melted butter
  • 1/2 tsp Orange zest
  • 3-5 TBS Orange juice
  • Mix the ingredients together, slowing adding the orange juice, until you get the glaze as thick or as thin as you desire.
  • Apply glaze after the scones have cooled on a rack for at least 5 minutes.
Dry Ingredients, ready for the bits!

Dried Cranberries and some Orange Zest

Easy going, mixing in the heavy cream!

Dough ball is a little sticky.

Make it about 1/2” thick

Cut into 8 pieces

Spread apart on the cookie sheet

Brushed with melted butter

Choc. Chip and Cranberry Varieties

Cranberry ready for the glaze

Apply the glaze to barely warm scones

Add a little honey butter for a finishing touch!


Don’t try to be healthy on this one and use Half/Half or Whole milk or 2% milk, the scone will be tough and heavy. You are going for light and fluffy moist yummy! I generally buy a quart of heavy cream, that way I can make two varieties at the same time. My kids like the chocolate chip ones and I like cinnamon chips or dried fruit in mine. I also make honey butter to put inside, but that’s my little treat. You can put inside them whatever you wish. They are actually pretty darn good without any add ons.

Funny little side note... I made six batches of this dough to use as just plain round biscuits for a Men’s Breakfast at church (I also supplied 2 gallons of sausage gravy...). Anyway, my husband came home with 8 or 10 leftover biscuits. Later that evening, I used those leftover biscuits and made the absolute best bread pudding I have ever eaten. I have tried making bread pudding the “normal” way since, and it has never been as good as my biscuit bread pudding. Kinda funny.

Try this one and show me your baking successes! Your family and friends will thank you for giving this one a shot.

As the mixing bowl turns,
Donna ; - )

Friday, June 20, 2014

Meltaway Cookies with Cream Cheese Frosting: They disappear so fast, you’ll have to eat another!

Meltaway Cookies with Cream Cheese Frosting
At some point, I will need to get my sweet-tooth under control. But the other night I was sharing some of my Facebook recipes with a young baking enthusiast and now I can’t get these cookies out of my mind. It’s sad. Why can’t I feel that way about a salad? Because salads don’t have sugar and butter, that's why!

I originally saw this recipe on Pinterest. Several blog sites have posted it. I found it to be a great, shortbread type of cookie that can be tweaked to fit whatever flavor creations you would enjoy. I didn’t use anything but butter and vanilla in mine, but you could use cocoa powder, almond flavoring, minced nuts, lemon flavoring/juice, the list goes on and on.

These cookies are very deceiving. The other sites showed them as little 2-bite size cookies. So, me being me, I thought that would take way too long to bake and ice all those tiny cookies. Well, these little suckers are very rich. It’s up to you which size you choose to make them. Just thought I would warn you.

They are so light and literally melt in your mouth. So good!! I mean, a cup of butter; how can that go wrong?

They will hold up well at your outdoor events this summer. I think you could serve them without icing if you mixed a bit of cinnamon to the powder sugar used to tamp the cookies down before baking.

It’s an easy recipe. Only six ingredients! You need to give it a try. And yes, you really do use that much cornstarch.

Meltaway Cookies
Ingredients:
  • 1 Cup butter, soft
  • 3/4 Cup cornstarch
  • 3/4 Cup powdered sugar
  • 1 Cup all-purpose flour
Instructions:

  1. In a medium bowl, cream butter until fluffy. 
  2. Add cornstarch and sugar, blend well. 
  3. Beat in flour until thoroughly mixed. 
  4. Roll into small balls and drop onto a baking sheet. Flatten each ball down with the bottom of a glass. (Dip glass in powdered sugar to prevent sticking.)
  5. Bake at 350 degrees for 10-12 minutes, or until edges become golden in color.
  6. Cool on wire rack, then decorate with Cream Cheese Frosting.

Cream Cheese Frosting Recipe

Ingredients:
  • 3 oz. of cream cheese, softened
  • 1 Cup powdered sugar
  • 1/2 tsp. vanilla
Instructions:

  1. Mix all ingredients together. 
  2. Add food coloring or flavorings of some sort to vary the recipe if you choose. Be creative!
Meltaway Cookies, recipe makes over 2 dozen
Baby showers, wedding showers, picnics, July 4th parties, you name it, these cookies are ideal for theme based get-togethers. You can color the dough or the frosting, or both. Have fun with this one. Please send me a photo of your creations! I’d love to see it and possibly try your version!

As the mixing bowl turns,
Donna ; - ) 

Wednesday, June 11, 2014

Lemon Squares: You had me at two sticks of butter!

Lemon Squares
Hello, my name is Donna and I have a lemon square problem. It all started in a little sandwich shop in Edmond, OK that a coworker and I visited. They had a special, half a sandwich and soup or salad or dessert. Psh, that was easy. I can't even remember the other desserts that were offered, because at that first lunch I chose their Lemon Square.

Tart, sweet, buttery. You had to watch and not exhale when you took a bite or powdered sugar would go sailing onto your lunch companion. I was hooked. Since that day if a bakery offers them in the display case, I HAVE to buy one. No hesitation. Done.

A few months ago a sweet friend I have known since we both were in summer camp shared her Lemon Square recipe. I had just moved to California and a lady at church had a bumper crop of lemons that she gave to anyone who would bag them up. Both those gifts happened in the same week. That had to be a sign. I must make Lemon Squares.

The only healthy thing in this recipe might be the fresh lemon juice. The large quantities of butter and sugar pretty much take over after that and you are to enjoy the experience and not worry about it. Either cut a smaller square or run an extra lap. Your choice. The crust is what makes this recipe even better than the store bought variety. Well, there are two sticks of butter in the crust, which I am sure is what makes all the difference.

Lemon Squares
Oven temp: 350 degrees
Bake time: 25-30 minutes

Ingredients:

  • 2 sticks butter, room temperature
  • 2 cups all-purpose flour
  • 1/2 powdered sugar
  • 4 eggs
  • 2 cups sugar
  • 1/3 cup lemon juice
  • 1/2 tsp baking powder


Instructions

  1. Spray a 9 X 13 baking pan, preheat oven to 350 degrees.
  2. Combine the butter, flour and powdered sugar until it is a bowl of small crumbly bits.
  3. Press the crumblies into the prepared pan.
  4. Bake for 20-25 minutes, or until the crust is golden around the edges.
  5. While the crust bakes beat eggs, sugar, lemon juice and baking powder together.
  6. When crust is done, pour lemon mixture over the crust and return the pan to the oven
  7. Bake for an additional 25-30 minutes, until the top begins to turn golden brown. (My oven runs hot so I put 2 cookie sheets under my baking pan when I returned it to the oven to prevent the bottom of the crust from burning.)
  8. Cool for 10 minutes, then sprinkle with powdered sugar
  9. Cool completely before slicing.
  10. Store in an airtight container, if they last that long.

Initial blending of butter into dry ingredients.
The crumbly form.
Crumbles pressed into prepared baking pan.
My favorite gadget.
All the filling ingredients.
Pouring filling over hot crust.
Cook until the filling doesn’t jiggle.
Dust with powdered sugar.
Enjoy a lemon square, or two.

I love my little yellow lemon juicer gadget. It was free in a bag of lemons I purchased at least six years ago. There is probably a much nicer, sturdier version for purchase, but I will keep using mine. 

This recipe doesn’t have a ton of ingredients and is pretty straight forward and easy. I hope you give it a go! They are lovely with a spot of tea in the afternoon!

As the mixing bowl turns,
Donna ; - )

Monday, June 9, 2014

Caramel Macchiato Coffee Cake: Should have thought of this years ago!

Caramel Macchiato Coffee Cake
Some people love candy. Not me. I’ll take a good piece of cake anytime. I’ll actually take a dry piece of cake. I love cake. Lately, I’m into caramel, vanilla, buttery flavors. A few days ago I woke up around 4 o’clock; couldn’t get back to sleep. And when I can’t sleep, I think about what is in my pantry and my fridge that I can combine to make something yummy and different. Yeah, that may not be normal, but it’s my normal. Anyway, all that thinking made me hungry. By 5:30 a.m. this cake was ready. It was still hot when I took that first slice out. Oh, it was SO good with that pot of strong coffee I had made.

Two things:  1) If you don’t want to make it from scratch, just get a “butter” yellow cake mix and add the cinnamon and praline liqueur. 2) You don’t have to use the praline liqueur, you could use butter flavoring, a nut flavoring, extra vanilla, or absolutely no extra flavoring at all. I just love my little bottle of praline liqueur and try to find any way I can to sneak it into a recipe. I honestly just like to smell it. If you get some, you will totally understand. I’m not crazy.

The first name I came up with was way too long, and later on I was at Starbucks drinking a Caramel Macchiato and it hit me...this kinda tastes like the glaze I made on my cake! So, thus, the cake is now named for my Starbucks obsession. Not very original, but it lets you know what flavors you will be enjoying.

Caramel Macchiato Coffee Cake

Oven:  350 degrees
Time:  40-45 minutes

The cake is a standard 1-2-3-4 Butter Cake recipe, older than any of us reading this blog. My additions are the cinnamon and praline liqueur. For those that are into the salted caramel craze, you could sprinkle  some coarse salt or sea salt on top for that flavor punch.

Ingredients:

  1. 1 cup butter, room temperature
  2. 2 cups sugar
  3. 3 cups all-purpose flour
  4. 4 eggs
  5. 3 tsp baking powder
  6. 1 tsp cinnamon
  7. 1 cup milk
  8. 1 tsp vanilla
  9. 1 TBS praline liqueur

Instructions:

  1. In a large mixing bowl, cream butter and sugar until light.
  2. Add eggs, one at a time, beating each in thoroughly.
  3. Add dry ingredients, alternately with milk and flavorings.
  4. Bake in greased/floured bundt pan, 350 degrees for 40-45 minutes, or until toothpick comes out clean.
  5. Let set for a couple of minutes in bundt pan, then turn onto cake plate to cool while you mix up the glaze.


Caramel Macchiato Glaze

Ingredients:

  • 1/2 box powdered sugar
  • 2 heaping TBS of caramel sauce (like you use on ice cream)
  • 1 TBS melted butter
  • 1/4 cup strong coffee, set aside

Instructions:

  1. In a medium size bowl, place powdered sugar, caramel sauce, melted butter.
  2. Slowly add in coffee and mix well. Add more or less coffee until you achieve the thickness you desire of your glaze. If it gets too thin, just add a more powdered sugar.

Caramel Macchiato Coffee Cake

This cake is rich in flavor, moist and became an family favorite immediately! This would be perfect to take to a potluck or an early morning meeting at work to share. However, the three of us are content to keep this one all to ourselves.

I make most every cake in bundt form these days, just because it is easier for my family to access. You could definitely make this a two layer cake. You would just need to cut the cooking time down to 25-30 minutes and make a little more glaze....maybe make it thicker, more like an icing.

Note regarding the glaze:  My daughter and I like really strong coffee, so I have started buying a can of espresso grind coffee and mixing it with either French roast or Columbian roast (whichever happens to be on sale that week). So my coffee is really strong and you can easily taste that rich flavor in my glaze. If you don’t like a real coffee hit, then your regular strength coffee will give you a hint of that flavor.

I hope you give this cake a try and please send me a photo! Or send me one of your recipes to try!

As the mixing bowl turns,
Donna ; - )

Wednesday, May 28, 2014

Oatmeal Cookies on a whole nother level: Organic Multi-Grain Oatmeal Cookies

Organic Multi-Grain Oatmeal Cookies
Last night, I told my daughter I would get up early to make a batch of oatmeal cookies to take to her friend’s house. It’s sad, but as a southern woman, I cannot seem to allow my children or spouse to show up empty handed when visiting someone. As my luck would have it, I only had one cup of instant oatmeal left in the container on my pantry shelf. Drat. I don’t want to go to the store at 7 a.m.

Organic Multi-Grain Oatmeal
I then remembered that we had a visitor a few weeks ago that was a “healthy” eater. I had purchased a number of organic items for her, one being multigrain instant oatmeal packets! I’m saved! This particular organic oatmeal also contained wheat, quinoa, rye and flax seeds. These cookies will not only be good, but they will also be healthy! (I have always convinced myself that eating a couple, or three, oatmeal cookies in the morning for breakfast was equivalent to eating a bowl of oatmeal. Rids the guilt.) But please know that you do not have to use organic, or even multi-grain products in this recipe. Plain old quick oats are perfectly fine to use.

In full disclosure, the only portion of this recipe that is totally organic is the multigrain instant oatmeal. The rest could have been organic, if those products had been purchased by me at my local grocery store.  There are whole sections now, dedicated to ingredient conscious cooks. I could have probably even made them gluten-free if I had that type of flour as well. So the name is sorta misleading, but it isn’t a full fib. I did use Organic Multi-Grain Oatmeal. There. I feel better.

This cookie is nutty, buttery, semi-soft and not overly sweet. It’s packed full of energy boosters and nutrition that will keep you going all morning if you eat them with your morning cup of coffee or tea. The yield is 6-dozen, so feel free to freeze half the dough to use another day if the batch is too large.

A few years ago I purchased a stainless steel scoop to use for cookie dough and melon balls. I had a plastic one that just wouldn’t let go of the dough I scooped up in it. This one is much better. Plus, it keeps the cookies uniform in size. I used the two-spoon method for years. I had horrible technique, so the scoop was added to my utensils drawer.

The cookie received rave reviews from my daughter this morning. Two dozen, plus a gallon of sweet tea are headed to a swimming pool in Calabasas as I type! I hope her friends enjoy them.

Organic Multi-Grain Oatmeal Cookies

Oven temp:  375 degrees
Yield:  6 dozen

Ingredients:

  • 1 cup butter, margarine softened
  • 1 cup granulated sugar
  • 1 cup brown sugar, firmly packed
  • 2 eggs
  • 2 tsp vanilla extract
  • 2 cups all-purpose flour
  • 2 tsp cinnamon
  • 1 tsp salt
  • 1 cup instant oats, uncooked
  • 2 cups organic multi-grain instant oatmeal, uncooked
  • 1 cup nuts, chopped (I used sliced almonds, but any nut will do...you could also use raisins if you wish.)


Instructions:

  1. Cream butter, sugars until smooth.
  2. Beat in eggs and vanilla
  3. Add flour, cinnamon, baking soda and salt
  4. Fold in oats and nuts
  5. Chill in fridge for 10 minutes. (makes scooping easier)
  6. Arrange scoops on either a greased cookie sheet, or a sheet lined with parchment paper
  7. Bake 10-12 minutes. (10 for chewy cookies, 12 for crisp cookies)
  8. After cooling store in an air-tight container.


Multi-Grain: flax, oats, barley, wheat, quinoa and rye
Chilled cookie dough ready to scoop.
Oatmeal cookies ready for the oven.
Multi-Grain Oatmeal goodness!
Organic Multi-Grain Oatmeal Cookies

I used a combination of quick oats and the organic multi-grain oats. You could use all of either. It’s just up to you. Please let me know if you try this recipe and tell me how they turned out!

A wonderful woman passed on today. A woman that touched more people than we can count. I will end this blog with a photo of her and one of her inspirational quotes that we should all take to heart. R.I.P. Miss Maya. We are all better for having listened to your words.

As the mixing bowl turns,
Donna 

Maya Angelou

Monday, May 12, 2014

A Summer Smash Hit: Squash & Zucchini Casserole

Squash & Zucchini Casserole
I cannot begin to tell you how much the internet and social media has added to my culinary life. It is just amazing to me that I can have a random thought about a church potluck 30-years ago, and wishing I could have one more taste of ______. Well, thanks to the web, we can all Google combinations of ingredients or names and presto....there is the recipe! I have rediscovered my childhood recipes, one search at a time!

Recently, a dear college friend shared a family favorite, and I too remembered loving this dish as a kid in the 70s. However, me being me, I just felt the need to tweak it a bit and make it my own. It’s annoying to my family. Why can’t I just leave well enough alone. I know, I know. Heard it a zillion times. But I will say, this little experiment worked out pretty darn well, if I do say so myself.

The idea was hatched more out of an overabundance of zucchini in my crisper, than it was trying to be clever. Plus, I did not want to go to the store an get more yellow squash. Okay, so I’m thrifty. Shoot me! It is rich and buttery and the zucchini gives it just a tad bit of texture that the regular recipe does not have. It’s pretty much perfect. 

As with many recipes I tweak for my family, I made our version without the cheese. I don’t think it took away anything with regard to flavor, but made the recipe have fewer calories and fat. You can fix it either way.

Summer Squash & Zucchini Casserole


  • 4 cups cubed fresh yellow squash
  • 4 cups cubed fresh zucchini
  • 1 large onion, chopped

Squash & Zucchini Casserole ingredients
Squash, zucchini and onions in the pot.


Add these to a pot of water, boil until tender. Drain, smash and add the following ingredients:

All ingredients into the pot, mashed.
  • 1 can of cream of chicken soup
  • 2 eggs, already mixed together
  • 1 cup grated cheddar cheese
  • 1/2 stick melted butter
  • and a little black pepper...
Mix, mush up well then pour into a buttered casserole dish and cover with the following:
Adding cracker topping.
  • 1/2 cup grated cheddar cheese
  • 1 cup crushed Ritz or Townhouse crackers (any buttery type)
  • 1/2 stick margarine or butter melted


Sprinkle with the cheese, then cover with the cracker crumbs and drizzle the crumbs with the melted butter. Bake at 350 degrees for 40-45 minutes....when the top gets browned and a knife blade comes out clean when you stab it in the middle of the casserole.

After cracker topping is drizzled with melted butter

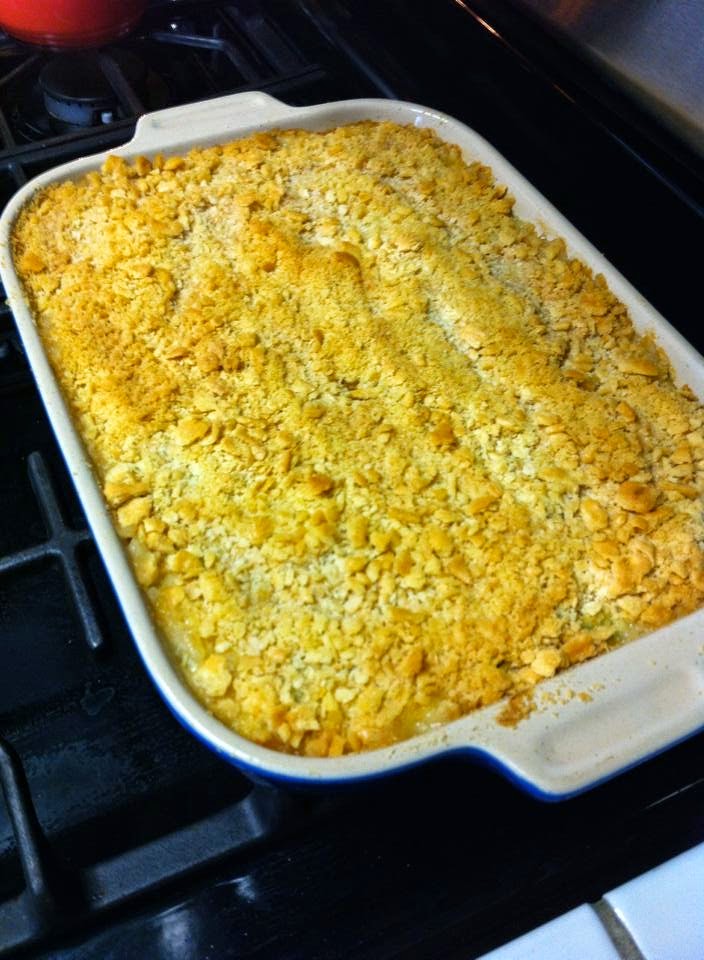
After it has browned and is bubbly and oh so yummy!
This side dish can go with just about anything. I like to serve it with fish. Living in New England I became a pro at baking fish and not drying it out. Our fish of choice is salmon. It’s pretty simple.

Baked Salmon seasoned and ready for the oven.
Wash the salmon off, pat it dry and place it, skin side down on a foil lined cookie sheet (or parchment paper lined). Drizzle sheet with olive oil. Add fish. Season with salt, black pepper, a little garlic....or use any seasoning blend you enjoy. Drizzle a little olive oil on top. 

The general rule I was taught, was to bake fish 8-minutes for every inch of thickness. With this slab of salmon, I turned the oven up to 400 degrees and baked it for 9 minutes. It was perfect. Sorry, I forgot to snap a photo after I took it out of the oven. I generally put 4-5 fresh lemon slices across the top as it bakes....I was just out of lemon that day. But it’s easy, quick and much healthier than frying it.

This technique can be used on any type of fish...even catfish filets.

(However, I must note that the side dish has butter and cheese in it...so what you save in being healthy with the baked salmon, is totally lost in the casserole.)

There you go, fresh garden veggies and fish. Give it a go! Maybe it will become a favorite of yours?

As the mixing bowl turns,
Donna ; - )