Showing posts with label Zucchini. Show all posts

Wednesday, June 4, 2014

Quick Healthy Meal: Chicken Spaghetti with Oven Roasted Pattypan Squash Medley and Jazzed-Up Crescent Rolls

Ever have leftover chicken or turkey. Are you tired of always making either chicken salad or turkey salad out of it? Well, if you cannot relate, just read along anyway, cause today’s blog is about using up leftover poultry meat and making Chicken Spaghetti.

Chicken Spaghetti with Pattypan Squash
It’s usually around 3:30 in the afternoon when I realize I need to do something about supper. Like right now, it is 3:15 here and I haven’t a clue. So, instead of dealing with the problem, I’m gonna blog about it and then most likely have a pizza delivered. That’s just the way I roll these days.

But back to the recipe... At the last minute, my daughter had a friend come over on Saturday. It was too late for me to go to the store, so I had to come up with something hearty, nutritious and in a hurry. She and her friend had been hiking and I knew they would be hungry. I always have pasta of some sort in my pantry, and a jar or two of my favorite spaghetti sauce. However, I did not have anything to make a beef or sausage based meat sauce or meatballs (by the way, my meatball are fab!) out of; but I did have leftover chicken! I’ve seen Chicken Spaghetti on menus before, but I had never eaten any. It was worth a shot.

Here is my version of Chicken Spaghetti. I also rounded off the meal with Oven Roasted Pattypan Squash, mixed with other vegetables.

Chicken Spaghetti

Skillet meal: 30 minutes
Serves 4-6

Ingredients:

  • 1 box thin spaghetti, cooked according to package directions
  • 2 cans or jars of your favorite spaghetti sauce
  • 2-3 large chicken breasts, cooked, shredded
  • 1 cup chopped onions
  • 1 cup chopped green bell pepper
  • 1 cup chopped other colored bell pepper (they are sweeter)
  • 2-3 cloves chopped garlic
  • 1/8 cup chopped Mild Banana Pepper rings (in the pickle section)
  • To taste: salt, black pepper, garlic powder, dried Italian seasoning blend, dried oregano, red chile flakes...basically anything that you like and makes you think of Italian flavors.

Instructions:

  1. As your pot of water is heating up to cook your pasta, in a large skillet with a lid, add a drizzle of olive oil and begin to sweat the onions, garlic and peppers.
  2. After the onions become clear, add your shredded chicken
  3. Next add the seasonings
  4. Pour on the spaghetti sauce and mix well.
  5. Let simmer at least 15-20 minutes so that all of the flavors meld together
  6. Serve over cooked pasta, top with parm or your favorite cheese
Sauteed onions, garlic and peppers.

Shredded chicken and Italian style seasonings.

Simmer with favorite spaghetti sauce.


My husband came home from the farmer’s market this week with pattypan squash. I had never eaten pattypan squash. It tastes just like the yellow crook-neck squash I grew up eating. You can bake it, stuff it, batter and fry it. In this case, I oven roasted it. I love oven roasting my veggies, it makes their true flavor come through and gives them a rich, sweet taste.

Oven Roasted Pattypan Squash Medley

Oven: 400 degrees
Time: 15 minutes

Ingredients:

  • 3 cups yellow squash, cubed
  • 2 cups zucchini, cubed
  • 1 cup chopped onion
  • 1 cup mini carrots

Instructions:

  1. Place all prepared veggies on a cookie sheet that has been lined with foil or parchment paper
  2. Drizzle with olive oil
  3. Add salt, and black pepper
  4. Toss until all veggies are coated
  5. Roast in the oven set on 400 degrees for 15 minutes
  6. You may stir around a couple of times to prevent uneven browning or sticking
Yellow Pattypan Squash

You can add any veggie you like to this recipe.


Actually, you can put a roll of jazzed up crescent rolls in the oven at the same time as the veggies. The rolls will be finished a couple of minutes ahead of the veggies, but you will get two thing accomplished at the same time.

Jazzed-Up Crescent Rolls

My family loves crescent rolls. The only downside to jazzing them up, is that I have to make twice as many of them. They are always a big hit! Buttery, flakey and now garlicky!

Ingredients:

  • 1 or 2 tubes crescent rolls
  • To taste: garlic salt or powder, parsley flakes, grated parm cheese


Instructions:

  1. On a cookie sheet lined with parchment paper, arrange all the crescent rolls according to the package instructions.
  2. Sprinkle with garlic, parsley and parm...as much as you wish
  3. Bake according to package instructions

Crescent rolls ready for the oven.

Golden, buttery, garlicky, flaky goodness!

Canned biscuits with garlic, parm, parsley and a little olive oil drizzle.

They are sooooo good!

There were four of us at supper. I made 16 rolls....only two rolls remained. That’s how good they are. You can do the same thing with canned biscuit dough...pretty much the same outcome and response...they just disappear!

Instead of focusing on just one item this time, I decided to give you an idea for a whole meal. I started the meal with a basic green salad. The hikers and my husband seemed to enjoy every bite and washed it all down a gallon of sweet tea.

So next time you have company pop over unexpectedly, don’t panic. I bet you have enough stuff right there in your pantry and crisper to make a great meal!

As the mixing bowl turns,
Donna ; - )


Thursday, May 22, 2014

Early Morning Booster: Blueberry Zucchini Bread

Blueberry Zucchini Bread
Zucchini Bread replaced Banana Bread years ago in my kitchen. I think I just made way too much banana bread; using up the bananas as they darkened when the kids were little. But one day, I was given a small loaf of zucchini bread and I instantly had a new favorite breakfast cake. (My second favorite now is Strawberry Bread, but that’s for another blog, another day.)

This bread is always moist, flavorful and is a great way to use up zucchini from your garden! The cinnamon and nutmeg make the house smell amazing! And if you have picky eaters, they will never know that there is zucchini in the bread. So feel free to name it whatever you wish in order to get your family to eat it.

Originally, this recipe called for nuts. Well, I didn’t have any nuts, but I did have a cup of blueberries in the fridge. So, once again, this recipe was crafted in order to alleviate a trip to the store and use up items I had on hand. Thankfully, the flavor combination worked. Plus, blueberries are really good for you. It is a Win/Win!!

Blueberry Zucchini Bread

Makes 2 Loaves, freezes well
Preheat oven to 350 degrees

Ingredients:
  • 3 1/4 cups all-purpose flour
  • 1 1/2 teaspoons salt
  • 1 teaspoon ground nutmeg
  • 2 teaspoons baking soda
  • 1 teaspoon ground cinnamon
  • 3 cups sugar
  • 1 cup vegetable oil (I used canola)
  • 4 eggs, beaten
  • 1/3 cup water
  • 2 cups grated zucchini
  • 1 teaspoon lemon juice
  • 1 cup blueberries
  • Optional:  you can use one cup of chopped nuts instead of, or with the berries.

Instructions:

  1. In a large bowl, combine flour, salt, nutmeg, baking soda, cinnamon and sugar. 
  2. In a separate bowl, combine oil, eggs, water, zucchini and lemon juice. 
  3. Mix wet ingredients into dry, add blueberries and fold in. 
  4. Bake in 2 standard loaf pans, sprayed with nonstick spray, for 1 hour, or until a toothpick comes out clean. 
  5. Or, bake in 5 mini loaf pans for about 45 minutes.
  6. Another option is to grease the loaf pan, then make a cinnamon/sugar mixture and instead of flouring the loaf pan, use the cinnamon/sugar. This will give it a nice sugary crust around the edges. Works great on bundt cakes, if you don’t want to make an icing or glaze.


Wet ingredients

Dry ingredients
Bread batter


Grated zucchini
Grated zucchini and blueberries


Added to the batter
Gently fold zucchini and berries into the batter


Blueberry Zucchini Bread hot out of the oven!


Moist and delicious Blueberry Zucchini Bread

One loaf, I made in a foil loaf pan and put it in the freezer after it had cooled. I wish this blog had a scratch/sniff button! Oh, it smells great....and tastes even better than it smells! Plus, you are getting a serving of vegetable and a fruit! This is health food we’re making here!

It’s been quite interesting to see what people read most on this blog. Though we all claim to be eating better, the sweets I have posted have gotten four times the hits than the savory recipes! I have no way of knowing which ones people are cooking. LOL!

Enjoy this holiday weekend with your family and friends and remember those that fought and died for us while serving this country. Because of them, we remain free.

As the mixing bowl turn,
Donna ; - )


Monday, May 12, 2014

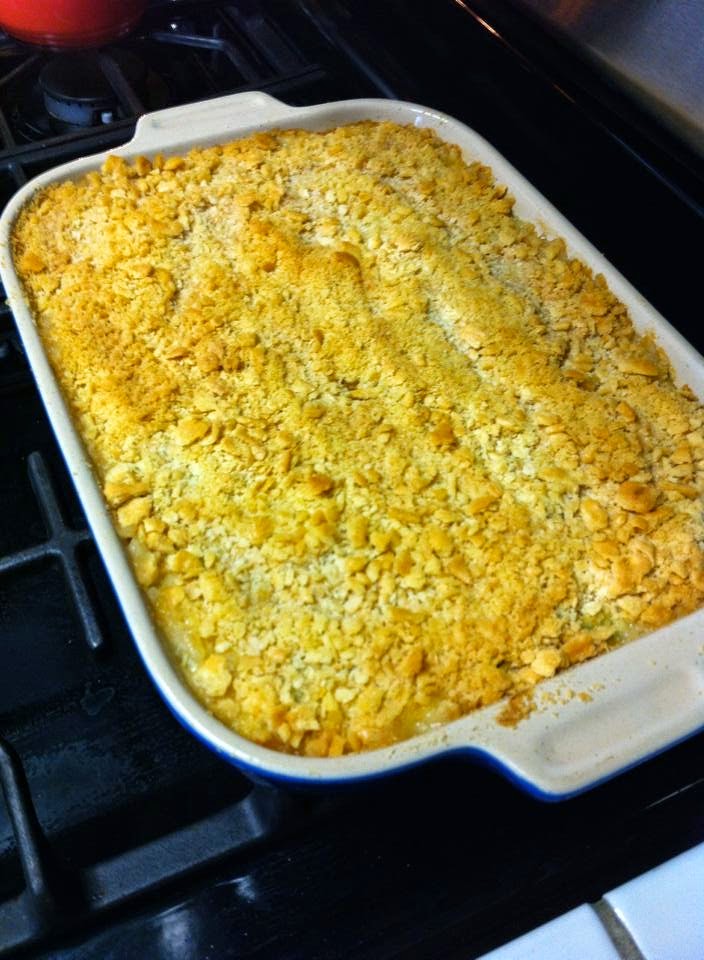
A Summer Smash Hit: Squash & Zucchini Casserole

Squash & Zucchini Casserole
I cannot begin to tell you how much the internet and social media has added to my culinary life. It is just amazing to me that I can have a random thought about a church potluck 30-years ago, and wishing I could have one more taste of ______. Well, thanks to the web, we can all Google combinations of ingredients or names and presto....there is the recipe! I have rediscovered my childhood recipes, one search at a time!

Recently, a dear college friend shared a family favorite, and I too remembered loving this dish as a kid in the 70s. However, me being me, I just felt the need to tweak it a bit and make it my own. It’s annoying to my family. Why can’t I just leave well enough alone. I know, I know. Heard it a zillion times. But I will say, this little experiment worked out pretty darn well, if I do say so myself.

The idea was hatched more out of an overabundance of zucchini in my crisper, than it was trying to be clever. Plus, I did not want to go to the store an get more yellow squash. Okay, so I’m thrifty. Shoot me! It is rich and buttery and the zucchini gives it just a tad bit of texture that the regular recipe does not have. It’s pretty much perfect. 

As with many recipes I tweak for my family, I made our version without the cheese. I don’t think it took away anything with regard to flavor, but made the recipe have fewer calories and fat. You can fix it either way.

Summer Squash & Zucchini Casserole


  • 4 cups cubed fresh yellow squash
  • 4 cups cubed fresh zucchini
  • 1 large onion, chopped

Squash & Zucchini Casserole ingredients
Squash, zucchini and onions in the pot.


Add these to a pot of water, boil until tender. Drain, smash and add the following ingredients:

All ingredients into the pot, mashed.
  • 1 can of cream of chicken soup
  • 2 eggs, already mixed together
  • 1 cup grated cheddar cheese
  • 1/2 stick melted butter
  • and a little black pepper...
Mix, mush up well then pour into a buttered casserole dish and cover with the following:
Adding cracker topping.
  • 1/2 cup grated cheddar cheese
  • 1 cup crushed Ritz or Townhouse crackers (any buttery type)
  • 1/2 stick margarine or butter melted


Sprinkle with the cheese, then cover with the cracker crumbs and drizzle the crumbs with the melted butter. Bake at 350 degrees for 40-45 minutes....when the top gets browned and a knife blade comes out clean when you stab it in the middle of the casserole.

After cracker topping is drizzled with melted butter

After it has browned and is bubbly and oh so yummy!
This side dish can go with just about anything. I like to serve it with fish. Living in New England I became a pro at baking fish and not drying it out. Our fish of choice is salmon. It’s pretty simple.

Baked Salmon seasoned and ready for the oven.
Wash the salmon off, pat it dry and place it, skin side down on a foil lined cookie sheet (or parchment paper lined). Drizzle sheet with olive oil. Add fish. Season with salt, black pepper, a little garlic....or use any seasoning blend you enjoy. Drizzle a little olive oil on top. 

The general rule I was taught, was to bake fish 8-minutes for every inch of thickness. With this slab of salmon, I turned the oven up to 400 degrees and baked it for 9 minutes. It was perfect. Sorry, I forgot to snap a photo after I took it out of the oven. I generally put 4-5 fresh lemon slices across the top as it bakes....I was just out of lemon that day. But it’s easy, quick and much healthier than frying it.

This technique can be used on any type of fish...even catfish filets.

(However, I must note that the side dish has butter and cheese in it...so what you save in being healthy with the baked salmon, is totally lost in the casserole.)

There you go, fresh garden veggies and fish. Give it a go! Maybe it will become a favorite of yours?

As the mixing bowl turns,
Donna ; - )